New NEM Testnet on Kubernetes
Ready to get your NEM testnet network running on Kubernetes? This guide will walk you through the process using Helm Charts.
First of all let me briefly explain what Kubernetes and Helm are.
Kubernetes(abbreviated as K8s but why?)) is a powerful open-source system for automating the deployment, scaling, and management of containerized applications. It provides a platform for deploying, running, and managing containers on clusters of servers, allowing developers to easily build, deploy, and manage complex, scalable applications without worrying about the underlying infrastructure. With Kubernetes, you can build, deploy, and manage applications in a consistent, reliable, and scalable way, making it an essential tool for modern cloud-native development.
Helm is a package manager for Kubernetes that allows developers to easily package, configure, and deploy applications and services on Kubernetes clusters. Helm Charts are pre-configured packages of Kubernetes resources that can be deployed as a group. This makes it easy to reuse and share common configurations and simplifies the process of deploying complex applications on Kubernetes. Using Helm Charts can help save time and effort when deploying applications on Kubernetes, and they also make it easy to maintain and update applications over time.
Setting up the environment
Requirements
- Docker v20.10.21 as a Containerization environment
- Kubernetes v1.21 as a container orchestration platform
- Helm v3 as a Kubernetes package manager
- kubectl to run commands against Kubernetes clusters.
How to install?
Docker & Kubernetes
For the development and testing purposes, options are:
- (recommended) installing Docker Desktop which has a built-in Kubernetes support (you just need to enable K8s in the settings and it will also install kubectl for you)
- install Docker, minikube and kubectl separately.
For production purposes, the options are:
- using a managed Kubernetes service, such as Google Kubernetes Engine (GKE), Amazon Elastic Kubernetes Service (EKS), or Azure Kubernetes Service (AKS). These services allow you to easily create and manage a cluster of nodes without having to worry about the underlying infrastructure.
- use a tool like kubeadm to set up a cluster on your own servers or virtual machines. This option gives you more control over the installation process and allows you to customise your cluster to your specific needs.
Since this article is focusing on deployment of the nis-client to local environment so please note that you’ll need more research for production environment setup.
Helm
Please check out https://helm.sh/docs/intro/install/ to see the options to install.
Kubernetes Controllers
-
In order to be able to receive requests from outside of the cluster one of the options is to enable ingress in the Helm Chart values(we’ll delve into it in the following sections) and this will require an Ingress Controller to be present in the current cluster. For local setup we need to install
Ingress NGINX Controller. (for more options please check out the Ingress Controllers list)- create a file named
values-nginx-controller.yamlin the current directory with the following content:# configure the tcp configmap tcp: 7778: localhost:7778 # enable the service and expose the tcp ports. # be careful as this will potentially make them # available on the public web controller: service: enabled: true ports: http: 7890 https: 7891 targetPorts: http: http https: https - run the following commands:
 helm repo add ingress-nginx https://kubernetes.github.io/ingress-nginx
 helm repo update
 helm install ingress-nginx ingress-nginx/ingress-nginx --create-namespace --namespace=ingress-nginx -f ./values-nginx-controller.yaml
- create a file named
-
The local path provisioner in Kubernetes is a storage provisioner that allows users to create and manage persistent storage volumes backed by local storage on the nodes in a cluster.
To install in your kubernetes cluster, run the following command in the current directory:
kubectl apply -f https://raw.githubusercontent.com/rancher/local-path-provisioner/v0.0.23/deploy/local-path-storage.yaml
(Optional) Build nis-client docker image from source
By default helm package will automatically pull the required image from nemofficial/nis-client Docker Hub repo.
But if you like to build from source code, you need to run the following commands.
git clone https://github.com/NemProject/nem
cd nem
git checkout dev
cd ./infra/docker
docker build -t nis-client .
Deployment
Pull nem-helm-charts package
Currently nem-helm-charts helm package is not published to a public registery so we need to check out nem-helm-charts repository into our local.
mkdir -p workdir-new-nem-testnet
cd workdir-new-nem-testnet
git clone https://github.com/yilmazbahadir/nem-helm-charts.git
cd nem-helm-charts
Generate Nemesis block and node configurations
We need to use nemesis-generator to generate a custom nemesis file for the initial block and the network configuration.
cd ../workdir-new-nem-testnet
git clone https://github.com/NemProject/nemesis-generator.git
cd nemesis-generator
You will need Pyhton3 to be installed in your local(check the version with python3 --version). To install follow these instructions to install on Linux (or search online for other OSs).
Install dependencies
python3 -m pip install -r requirements.txt
Generate the configuration for the generator
Please note that in order to nodes can harvest properly, total supply should be around 9B. That’s why we’re setting balance to 450M for each one of the 20 accounts below.
python3 -m configuration_generator --count 20 --seed 450000000000000 --network-name testnet --output nemesis.yaml --accounts-output user.yaml
Generate NEM nemesis binary
python3 -m generator --input ./nemesis.yaml --output nemesis.bin
Generate NEM node configuration
Create nodes.yaml file for the node information in the following format:
nodes:
  - host: localhost-node1
    name: node1
  - host: localhost-node2
    name: node2
Since this is a local deployment you don’t have to own a publicly available domain name.
To set the localhost-node1 and localhost-node2 aliases in your local, follow these steps:
- Get your local network IP by running
ifconfig(linux, mac) oripconfig(windows)ifconfig # find the IP in the output, should be something like 192.168.0.12 - set the aliases
sudo vi /etc/hosts
# add the following lines, save and quit
# Please replace 192.168.0.12 with your actual internal network IP below
192.168.0.12 localhost-node1
192.168.0.12 localhost-node2
Note that using
127.0.0.1instead of your network IP won’t work! So please use your internal network IP.
And run the following command to generate node configuration to ./output folder:
python3 -m node_configuration_generator --accounts-file user.yaml --nodes-file nodes.yaml --nemesis-file ./nemesis.yaml --seed ./nemesis.bin --network-friendly-name ship --output-path ./output
Output files should be generated in the following structure:
./output
  |--node1
     |--config.user.properties
     |--nemesis.bin
     |--peers-config_testnet_ship.json
  |--node2
     |--config.user.properties
     |--nemesis.bin
     |--peers-config_testnet_ship.json
Helm configurations
In order to apply custom configuration we need to create the values yaml files that will override some of the default values and pass it to the helm install command.
We’ll use the files created in the previous step(nemesis generation & node config).
Copy nemesis-generator/output folder into the nem-helm-charts directory.
cd workdir-new-nem-testnet/nem-helm-charts
cp -R ../nemesis-generator/output .
Prepare base64 encoded nemesis file
Encode nemesis binary file with Base64 to a (nemesis-base64.)txt file (it will be same for all nodes)
base64 -i output/node1/nemesis.bin -o nemesis-base64.txt
We will pass this text file as a value(–set-file) to helm install command in the following sections.
Prepare the values.yaml file for nodes
For node1 create a file named values-node1.yaml (inside workdir-new-nem-testnet/nem-helm-charts) with the following content, pay attention to the comments and update the file:
config:
  user:
    nis.bootKey: # nis.bootKey from ./output/node1/config-user.properties
    nis.bootName: # nis.bootName from ./output/node1/config-user.properties
    nem.host: # nem.host from ./output/node1/config-user.properties
    nis.ipDetectionMode: Disabled

    nem.network: # nem.network from ./output/node1/config-user.properties
    nem.network.version: # nem.network.version from ./output/node1/config-user.properties
    nem.network.addressStartChar: # from ./output/node1/config-user.properties
    nem.network.generationHash: # from ./output/node1/config-user.properties
    nem.network.nemesisSignerAddress: # from ./output/node1/config-user.properties
    nem.network.totalAmount: "" # amount should be btw quotes, from ./output/node1/config-user.properties
    nem.network.nemesisFilePath: custom-nemesis.bin # don't change this

ingress:
  enabled: true
  className: "nginx"
  annotations:
  hosts:
  # update the hostname below!
    - host: # nem.host from ./output/node1/config-user.properties
      paths:
        - path: /
          pathType: ImplementationSpecific
          backend:
            service:
              port: 7890
        - path: /
          pathType: ImplementationSpecific
          backend:
            service:
              port: 7891
        - path: /
          pathType: ImplementationSpecific
          backend:
            service:
              port: 7778
  tls: []
Replicate the same steps to create values-node2.yaml file(using ./output/node2/config-user.properties this time).
If further configuration is desired you can check out all the available values in the repo.
Install helm package and deploy nodes
Node1:
helm install testnet-node1 ./charts/nem-client --create-namespace --namespace=testnet-node1 --set-file config.customNemesisFileBase64=./nemesis-base64.txt --set-file config.peersConfigJson=./output/node1/peers-config_testnet_ship.json -f ./charts/nem-client/values.yaml -f ./values-node1.yaml
Node2:
helm install testnet-node2 ./charts/nem-client --create-namespace --namespace=testnet-node2 --set-file config.customNemesisFileBase64=./nemesis-base64.txt --set-file config.peersConfigJson=./output/node2/peers-config_testnet_ship.json -f ./charts/nem-client/values.yaml -f ./values-node2.yaml
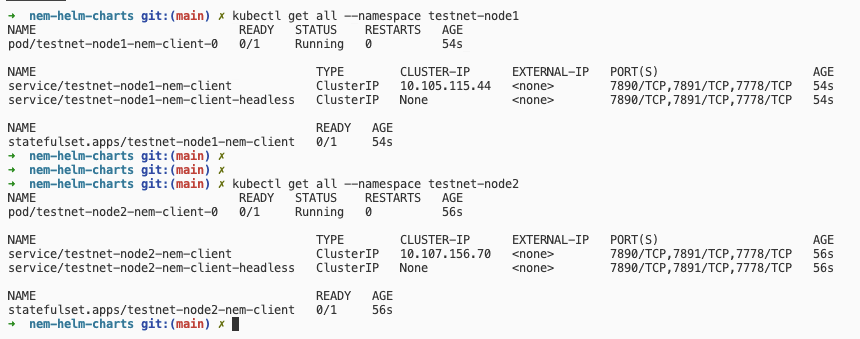
After these commands, run the following commands to check the deployment is complete.
kubectl get all --namespace testnet-node1
kubectl get all --namespace testnet-node2
Here is an screenshot of a successful deployment:
And to verify that the nodes are running with correct configuration, run the following commands
curl http://localhost-node1:7890/node/info
curl http://localhost-node2:7890/node/info
To check the nodes are harvesting, you should be observing that the height is increasing around every minute by running:
curl http://localhost-node1:7890/chain/height
curl http://localhost-node2:7890/chain/height
Uninstall
If anything goes wrong or you are done with your deployment, you can uninstall the helm packages from your K8s cluster, you can run the following commands:
helm uninstall testnet-node1 --namespace=testnet-node1
helm uninstall testnet-node2 --namespace=testnet-node2
You can verify that the uninstall is successful by running:
kubectl get all --namespace testnet-node1
# No resources found in testnet-node1 namespace.